Hello... ever since my last post which is a long time ago; the
R100GSPD has gone through significant upgrades. Im putting up this post reluctantly as i might let this PD go with the right offer. I will attempt to put up a comprehensive list of upgrades i have done with the bike since i took over 2 years ago. Lots of them (upgrades) were done in the last 6 months alone.
Upgrade List:1. First off...the engine has been
Overhauled with all seals changed when i first took over 2 years ago. A couple of gear box bearing has also been changed.
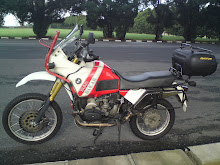
2. Found a used
Speedometer and managed to change this. You can compare the bike's earlier photo to the current one.
3. A new set of
Tires was changed 2 months ago. Sorry no pics to show for these...
4. The electrical system was given an early upgrade to the
Enduralast Alternator KitThis kit solved the original low charging output by the bike by increasing amperage by over 80% over stock Bosch system. It also gives out a stable output of 14.2V under all load conditions. The electronic voltage regulator / rectifier is also a significant improvement over the stock design which gives increased reliability to the whole electrical system of the bike. Check out the web link for more info of
EnduraLast.

5. I left this out in the original post so here it is. One other upgrade done very early when i first took over the bike is the changing of the starter motor. The upgrade is a
Valeo Starter. If you are interested, you can read more about starter motors in the old GS
HERE.
6. Perhaps one of the most significant upgrades to the bike is the changing of the front
Fork. For those of you who are familiar with the PD, you would know the soft and flimsy front fork on the bike. You could not go fast without having the feeling that the bike is running from under you. I had this insecure feeling on the bike until i made this upgrade.
Out went the old fork and in came a
WP Upside Down Fork. The purple colour on the bike is more than just cosmetic. This is a
Titanium Nitride coating applied on the fork which makes it more resistant to surface wear. The gold colour gives it the "Ohlins" look. With new brake disc, caliper, mud guard, the upgrade was complete. Overall, i say this is one major upgrade as the feel of the bike is very different now. With the changing of a progressive fork spring, the bike now is whole lot stable at higher speeds and corners alot better. Check out the pics below:


Please note that i just serviced both the rear shock and the front fork last month. Did an oil change plus a change of the seals. The rear shock is an
Ohlins.
7. Next up is an upgrade of the
Driveshaft. It is not uncommon to have drive shaft failure usually at the U-Joint in the original design. The shaft can also go "out-of-phase" as the original damper is made of rubber which loses its shock absorbing quality after some time as the rubber hardens.
HPM Guy from the States does upgrades on driveshafts. The upgraded shaft basically includes the following:
a. Replacement of stock rubber damper with a
Urethane damper made to match the customers specifications and usage. This cures the out of phase problem that plagues these shafts.
b. Conversion of driveshaft to accept, and installation of two heavy duty, high quality u-joints with grease fittings. The joints are held in place with circlips.
You can read more about it here: http://www.advrider.com/forums/showthread.php?t=130764&highlight=driveshaft+confusion
I have also attached pics for you to check it out. Please note that these pics are not mine, i did not manage to take any pics before installation. They are taken from the website but everything in the pic is the same as the one i received.


8. Another "old" (what is not old here??) part of the bike that died due to regular wear and tear was the ignition coil. After confirming that it was indeed the ignition coil, some replacement parts were ordered. This was an easy change but i was surprised by how old the spoilt part was by the looks of it. This must have been replaced before (with same stock parts) but looking at the condition of it, it must have been there for a long time! A new ignition coil, plug wires and ignition control unit was ordered from
Motorrad Elektrik. First impressions of this was a very smooth starting and engine running. Service was fantastic with questions answered promptly. Great upgrade! Photos here taken from website....same parts though..


9. About 4 months back the entire
Clutch set up was changed. Mind you, these are pretty hardy components so it must have been ages since this was last changed. It will probably last a whole life time (ok im exaggerating) after this. I changed the flywheel in the process. Something i found out later that was not necessary! Below are the parts that were installed:
-- 21211338680 Fillister-Head Screw
01 21211338722 Clutch Housing
02 21211338508 Diaphragm Spring 32025
03 21212302200 Plate 32120
04 21211451512 Clutch Plate 30400
05 21211457280 Housing Cover 32220
06 21211242377 Washer (A7,4) 32360
07 21211338680 Fillister-Head Screw 32310
10. 2 months back, the
Carburetor was rebuilt and upgraded with the following. I still have the receipts for these.
a. Carb Rebuild Kit
b. Idle Jet
c. Main Jet
d. Needle Jet
11. At the same time, a set of new float bowl kit from "BING" was installed. The
BING Alcohol Resistant Independent Float & Bowl Kit claims to give you improved performance and 5 to 7 MPG improvement on mileage. Check out the website at http://www.bingcarburetor.com/bmw/cvaccessories.html

12. Last but not least, the engine was given a new life with the
Replacement Kit Extra from Siebenrock (http://www.bmwbayer.de/index1.php?sprache=en). These are some of the improvements from this kit:
a. More power and torque for all R100 modells (from 1981) in the complete range of the numbers of revolutions.
b. Less exhaust fumes and lower fuel consumption.
c. The forged pistons are about 110 grams lighter than the originals parts. With a compression of 9,5:1, the power and torque are extremely increased. For instance, the motor power of a R100GS or R100R goes up to 67 hp. With improved power and torque curves, more driving fun is guaranteed.
d. The complete set for rebuilding is
2 cylinders, 2 pistons, 2 gudgeon pins, 4 lock rings, 6 piston rings. The bike feels alot more "zippy" after the upgrade and the bike is definitely smoother and quieter. Great upgrade....check out the pic of the upgrade kit. Read more here: http://www.siebenrock.com/index1.php?sprache=en


I shall stop here for now. On top of what has been mentioned above, there are plenty of little upgrades done on the bike the last 2 years. There really isnt much left to work on now =). And as i mentioned, im posting this reluctantly really. I feel it's time to move on. I probably will get another bike and work on it like i did with this. So if you are keen to own a classic legend; one that will go further now after all the work that has been done, do drop me a mail or SMS.
This bike is not for bargain hunters but for one who appreciates a piece of a legend. I will only let this go to one with a good offer plus he / she must be able to appreciate this beauty. I'm in no hurry to let it go as i have fully paid for the bike plus the bike has had such significant upgrades. COE expires in April next year. I had planned to renew it but decided to post here early to see if there is anyone who wants to take over. If there isn't anyone with a great offer, i will probably renew the COE and keep this bike. If you are the one who appreciate this machine, let's chat.... =) You can email me at:
tigerapple@gmail.com I got quite a bit of traveling in Sept - Oct so its best to email me if you want to find out more. Thanks for reading this!!! And have a nice day ahead!